
Posts about vim

Making a Vim watch face glow

I wanted a Vim styled watch face for my Garmin Fenix 8. Line numbers, a filename at the top, and status information along the bottom. The time and other watch data could be the contents of the file.

I also wanted it to look like an old green CRT, with glowing letters and scanlines across the display. Getting the text onto the screen was straightforward. Getting it to glow took quite a few attempts. Here's where I ended up with Vim Glow:
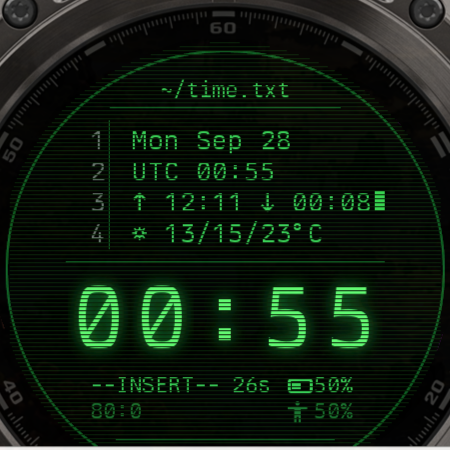
Vim Glow running in the Garmin Fenix 8 simulator, showing green terminal text, scanlines, and a large glowing clock

Getting the clock to glow

My first approach was to build bitmap font atlases from Berkeley Mono using BMFont. An atlas puts the characters into one image; the watch draws the part of the image containing the character it needs.

The plan was to layer blurred copies behind the sharp green letters. I tried fonts at different sizes and overlapping passes to get a soft halo around the text. That meant loading several large atlases. The first version loaded nine and crashed when the simulator ran out of graphics memory.

Smaller atlases helped with memory, but I still couldn't get the glow to blend correctly. The blur was visible in the generated PNGs, yet the clock looked sharp in the simulator. Drawing the blurred atlas on its own produced a black rectangle around it. Other transparent glyph images disappeared entirely. I tried blend modes and a bitmap buffer with alpha blending enabled, but couldn't get transparency working reliably.

Eventually I moved the clock's glow into the images themselves. I generated a separate image for each digit and the colon, with the blur and sharp letter already combined against a black background. The watch only has to draw the finished image.

The build script crops each character out of the atlas, then uses ImageMagick to blur its mask:

execFileSync("magick", [
  sharpPath,
  "-alpha", "extract",
  "-blur", `0x${blurRadius}`,
  "-evaluate", "multiply", glowAlpha,
  maskPath,
]);

It colours that blurred mask green and combines it with the sharp character on black. All the images use the same cell width, so the clock keeps its monospace spacing. Finally, the digits had the glow I'd been trying to get.

Putting the scanlines back

The scanlines had been troublesome for the same reason. I'd been drawing them behind the text, expecting them to show through the transparent parts of the letters. The opaque clock images now painted black rectangles over them. I had a glowing clock, but the scanlines stopped wherever a character was drawn.

The fix was to draw the scanlines last, over the letters and their glow. Multiply blending darkens the pixels already on screen:

function drawScanlines(dc, awake) {
    var color = awake ? SCANLINE_WAKE : SCANLINE;
    dc.setBlendMode(Graphics.BLEND_MODE_MULTIPLY);
    dc.setColor(color, BG);
    for (var y = 0; y < HEIGHT; y += 4) {
        dc.drawLine(12, y, WIDTH - 12, y);
    }
    dc.setBlendMode(Graphics.BLEND_MODE_DEFAULT);
}

Now the lines run across the whole face, including the clock. I'd originally expected to build the effect from transparent layers, but the opaque character images with scanlines drawn over them still give it the look I wanted.

Running the simulator locally

I ran Garmin's Connect IQ simulator in Docker. It needs older libraries, including GTK and WebKitGTK, and I wanted to keep those dependencies off my main system. The container runs the simulator window on my desktop, so I can load the watch face and see how the glow and scanlines look as I change them.

Try Vim Glow

If you want to try it on your Fenix 8, I made a web installer. Plug in the watch and open the page in Chrome or Edge on a desktop computer.

Pull Diagnostic Support for Neovim

I've used vim as my primary text / code editing tool for...literally decades. A few years ago, I tried out neovim, hoping to take advantage of more advanced developer oriented features like treesitter and native LSP support.

At Shopify, I do a lot of work in Ruby. Our incredible developer experience team maintain ruby-lsp, a language server for the Ruby language.

Of course, I wanted to make sure that using it in neovim was a great experience!

LSPs can do many things: auto completion, enabling jumping to function or type definitions, showing function documentation, code formatting, and displaying code linting results.

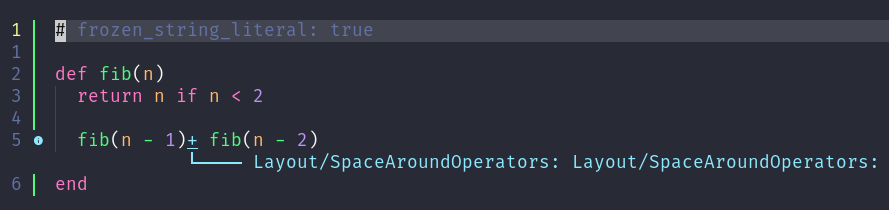
In this particular instance, I wanted to take advantage of ruby-lsp's "diagnostics" support, which provides real-time feedback about syntax or linting errors (via rubocop)

For example:

brief aside: I find the nomenclature here is a bit awkward. LSP is an abbreviation for "Language Server Protocol". neovim implements a client which implements the LSP, which connects to one or more servers with also implement the protocol. Commonly a server which implements the LSP protocol is referred to as an "LSP server" or "LSP." I'll do that here.

Push vs pull

Unfortunately for me, neovim before 0.10 only supports "push" diagnostics, and ruby-lsp only supports "pull" diagnostics.

"Push" diagnostics are where the LSP pushes diagnostic information about your source code to the client (neovim in this case). The challenge with push diagnostics is that it's difficult for the LSP to know when to generate and send the diagnostics. It has no way to coordinate with other LSPs, and doesn't really how the user is interacting with the editor, aside from receiving events when the sourcecode has been changed. This becomes a problem when many changes to a file are made; how does the LSP know when to generate and push the diagnostics? Should it do it on every change? Wait for a bit after the last change is made?

These challenges are why the language server protocol was updated to add support for "pull" diagnostics. In this model the client (neovim) requests diagnostics from the LSP server, which is much more efficient since the client (neovim) can make much better decisions about when to perform sourcecode diagnostics.

more technically, "push" diagnostics are implemented via the textDocument/publishDiagnostics method. "pull" diagnostics are implemented via the textDocument/diagnostic method

Pull support in neovim (open-source FTW!)

Last year I spent some time adding support for pull diagnostics to neovim 0.10. I learned a lot about neovim, LSP, and lua in the process!

To me, this really highlights the benefits of open-source: there was something in my toolbox that I wasn't happy with, and I am empowered (and encouraged!) to contribute and make it better for everyone! Of course, I relied heavily on more experienced contributors to the project, and, of course, my initial implementation required some follow-ups.

My first neovim plugin

However, neovim 0.10 hasn't been released yet, and so I also wanted to make sure that I could use ruby-lsp with stable (0.9.x) versions of neovim.

So I created my very first neovim plugin: https://github.com/catlee/pull_diags.nvim. This enables "pull" diagnostics for neovim prior to 0.10. It's not quite as efficient as the support built into 0.10, but it works for my day to day development. If it doesn't work for you, please let me know!

Installing it is quite simple; for example, with Lazy.nvim:

{
  "catlee/pull_diags.nvim",
  event = "LspAttach",
  opts = {},
}

Final thoughts

As a professional software engineer, I think it's important to invest in the tools that I use to get my work done. Concretely, this means that I need (and want!) to spend time learning what new tools and techniques are out there now, and to make sure to sharpen my tools.

In this case, I wanted to take advantage of a new technology (LSP & ruby-lsp) in my editor of choice (neovim). Since these tools are all open-source, I'm empowered to change them to fit my needs.

In other words, as professionals, we shouldn't accept drawbacks or limitations in our tools: we should fix them! It's just another piece of software after all!

Managing dotfiles with dotbot

We have an amazing development tool at Shopify called spin. Spin lets you create brand new cloud-based development environments in just a few seconds, right from your CLI. These environments are meant to be somewhat short-lived; I often spin one up just for the day to work on a PR, and then destroy it after my PR is merged.

As a longtime vim and linux user, I want to make sure that all my configuration files (aka "dotfiles") are made available automatically on any new environments that I'm setting up.

There are many different ways of managing your dotfiles. I started my journey with a "simple" shell script that tried to set up .vimrc, .zshrc, etc. Inevitably this script became overly complex, and was too cumbersome to maintain.

I briefly toyed around with ansible for managing my local system, but I found it to be overkill just managing dotfiles on remote systems.

Finally I discovered dotbot, which has a few features that I like:

  • No dependencies
  • Add into your dotfiles repo via a git submodule
  • Supports most of the stuff I need, without being too complicated
  • Configuration is easy to read & write
  • Safe to re-run

In particular, to set up neovim, I have something like this in my dotbot configuration:

# install.conf.yaml
---
- defaults:
    link:
      relink: true
      force: true

- link:
    # This line symlinks the astronvim repo from the dotfiles checkout 
    # into ~/.config/nvim
    ~/.config/nvim: vim/astronvim
    # Link in our user configuration for astronvim
    ~/.config/nvim/lua/user/init.lua:
      path: vim/user_init.lua

- shell:
    # Install all neovim plugins with packer
    - nvim --headless -c 'autocmd User PackerComplete quitall' -c PackerSync

Since setting up my dotfiles with dotbot, I've discovered that I'm much more willing to experiment with different configurations and tools. It's easy to blow away local directories, or git restore in my dotfiles repo, and then re-run the install script.

One small tweak I made to the generic install script is to split up configurations by operating system and environment. I have different configurations for Linux, macOS, and spin. I also have the install script send logs to the home directory, which makes it easier to debug when something has gone wrong. Adding exec &> >(tee -a $HOME/.dotfile-install.log) at the top of the install script copies the script output to a log file in my home directory, as well as outputting to stdout/stderr.

My dotfiles can be found on github.

svn-commit

Hate it when you write a big long commit message in subversion, and then the commit fails for some reason and you have to commit again? Tired of reading in the aborted commit log message into new commit log? Can't remember what subversion calls the aborted log messages? Me too. So I wrote this little plugin for vim that will look in the current directory for any aborted subversion commit logs. It will pick the newest one, and read that in. Just put this script into ~/.vim/ftplugin and name it something starting with "svn" and you should be good to go!


" SVN aborted commit log reader

" Reads in the newest svn-commit.tmp log in the current directory

" (these get left behind by aborted commits)

"

" Written by Chris AtLee 

" Released under the GPLv2

" Version 0.2


function s:ReadPrevCommitLog()
    " Get the newest file (ignoring this one)
    let commitfile = system("ls -t svn-commit*.tmp | grep -v " . bufname("%") . " | head -1")
    " Strip off trailing newline
    let commitfile = substitute(commitfile, "\\s*\\n$", "", "")
    " If we're left with a file that actually exists, then we can read it in
    if filereadable(commitfile)
        " Read in the old commit message
        "echo "Reading " . commitfile
        silent exe "0read " . commitfile

        " Delete everything from the first "^--This line" to the last one
        normal 1G
        let first = search("^--This line", "")
        normal G$
        let last = search("^--This line", "b") - 1

        if last > first
            silent exe first . "," . last . "d"
        endif
        normal 1G
        set modified
    endif
endf

call s:ReadPrevCommitLog()